Let's Shape The Future Of Your Investments!
Natoque iaculis cursus augue urna commodo aptent morbi tortor porttitor quis ornare.
In today’s fast-paced digital world, repetitive tasks are silently consuming our valuable time and creativity. Manual data processing, customer service responses, and information analysis—these seemingly “small” tasks can cumulatively leave us exhausted and unproductive.
Fortunately, we no longer need to handle everything manually. With n8n, a powerful, fair-code licensed workflow automation tool, combined with large language models (LLMs), you can build AI-powered digital employees that work 24/7, automatically handling everything from data collection and cleansing to analysis and decision execution.
Core Philosophy: You don’t need to write all the code yourself, but you must know how to design workflows.
n8n (pronounced “n-eight-n”) is a node-based low-code/no-code automation platform that allows you to connect different services (like email, databases, APIs, and AI models) through a graphical interface, forming complete workflows.
An AI agent builds upon large language models (LLMs), which generate text by predicting the next word based on input. While LLMs only process input to produce output, AI agents add goal-oriented functionality. They can use tools, process their output, and make decisions to complete tasks and solve problems.
In n8n, AI agents appear as nodes with additional connections, enabling you to combine AI-driven steps with traditional programming for efficient, real-world workflows.
The table below illustrates the core differences between basic LLMs and AI agents:
flowchart TD
    subgraph A [Large Language Model]
        direction LR
        A1[Input] --> A2[LLM]
        A2 --> A3[Text Generation]
    end

    subgraph B [AI Agent]
        direction LR
        B1[Goal] --> B2[AI Agent]
        B2 --> B3[Tool Usage]
        B3 --> B4[Decision Making]
        B4 --> B5[Task Completion]
    end

    A --> B
linkStyle default stroke:#fb923c,stroke-width:4px;| Feature | LLM | AI Agent |
|---|---|---|
| Core Capability | Text generation | Goal-oriented task completion |
| Decision-Making | None | Yes |
| Tool/API Usage | No | Yes |
| Workflow Complexity | Single-step | Multi-step |
| Scope | Generate language | Execute complex real-world tasks |
| Example | LLM generates a piece of text | An agent that schedules appointments |
Future work patterns are shifting from being “executors” to becoming “commanders.”
Key Insight: Any task that is rule-based, repetitive, and high-frequency deserves to be automated!
# Check Node.js version (requires v16+)
node -v

# Install n8n globally
npm install -g n8n

# Start service
npx n8n
Visit http://localhost:5678 to get started.
# Create persistent volume (prevents workflow loss)
docker volume create n8n_data

# Start container (with data persistence)
docker run -it --name n8n \
  -p 5678:5678 \
  -v n8n_data:/home/node/.n8n \
n8nio/n8nAdvantage: Cross-platform, no configuration required, one-click rollback.
To get your first AI agent into an application, follow these steps:
graph TD
    A[Create New Workflow] --> B[Add Chat Trigger Node]
    B --> C[Add AI Agent Node]
    C --> D[Configure AI Agent: Add Chat Model and Credentials]
    D --> E[Test Workflow]
    E --> F[Save Workflow]
linkStyle default stroke:#fb923c,stroke-width:2px; Every workflow needs a starting point.
++Tab++ or click “Add first step” to open the node menuThe AI Agent node is core to adding AI to your workflow.
The AI agent needs to connect to a chat model to process incoming prompts.
++Enter++By default, AI Agents don’t retain context between messages. To create conversational agents that remember previous interactions, you need to add memory:
For complex tasks, you can create specialized agent teams:
flowchart LR
    A[User Input] --> B[Orchestrator Agent]
    B --> C[Research<br>Specialist]
    B --> D[Analysis<br>Specialist]
    B --> E[Content<br>Creator]
    C --> F[Memory Store]
    D --> F
    E --> F
    F --> G[Final Response]
linkStyle default stroke:#fb923c,stroke-width:4px;
This multi-agent approach allows for specialized task handling while maintaining cohesive output.
AI agents in n8n can utilize various tools through node connections:
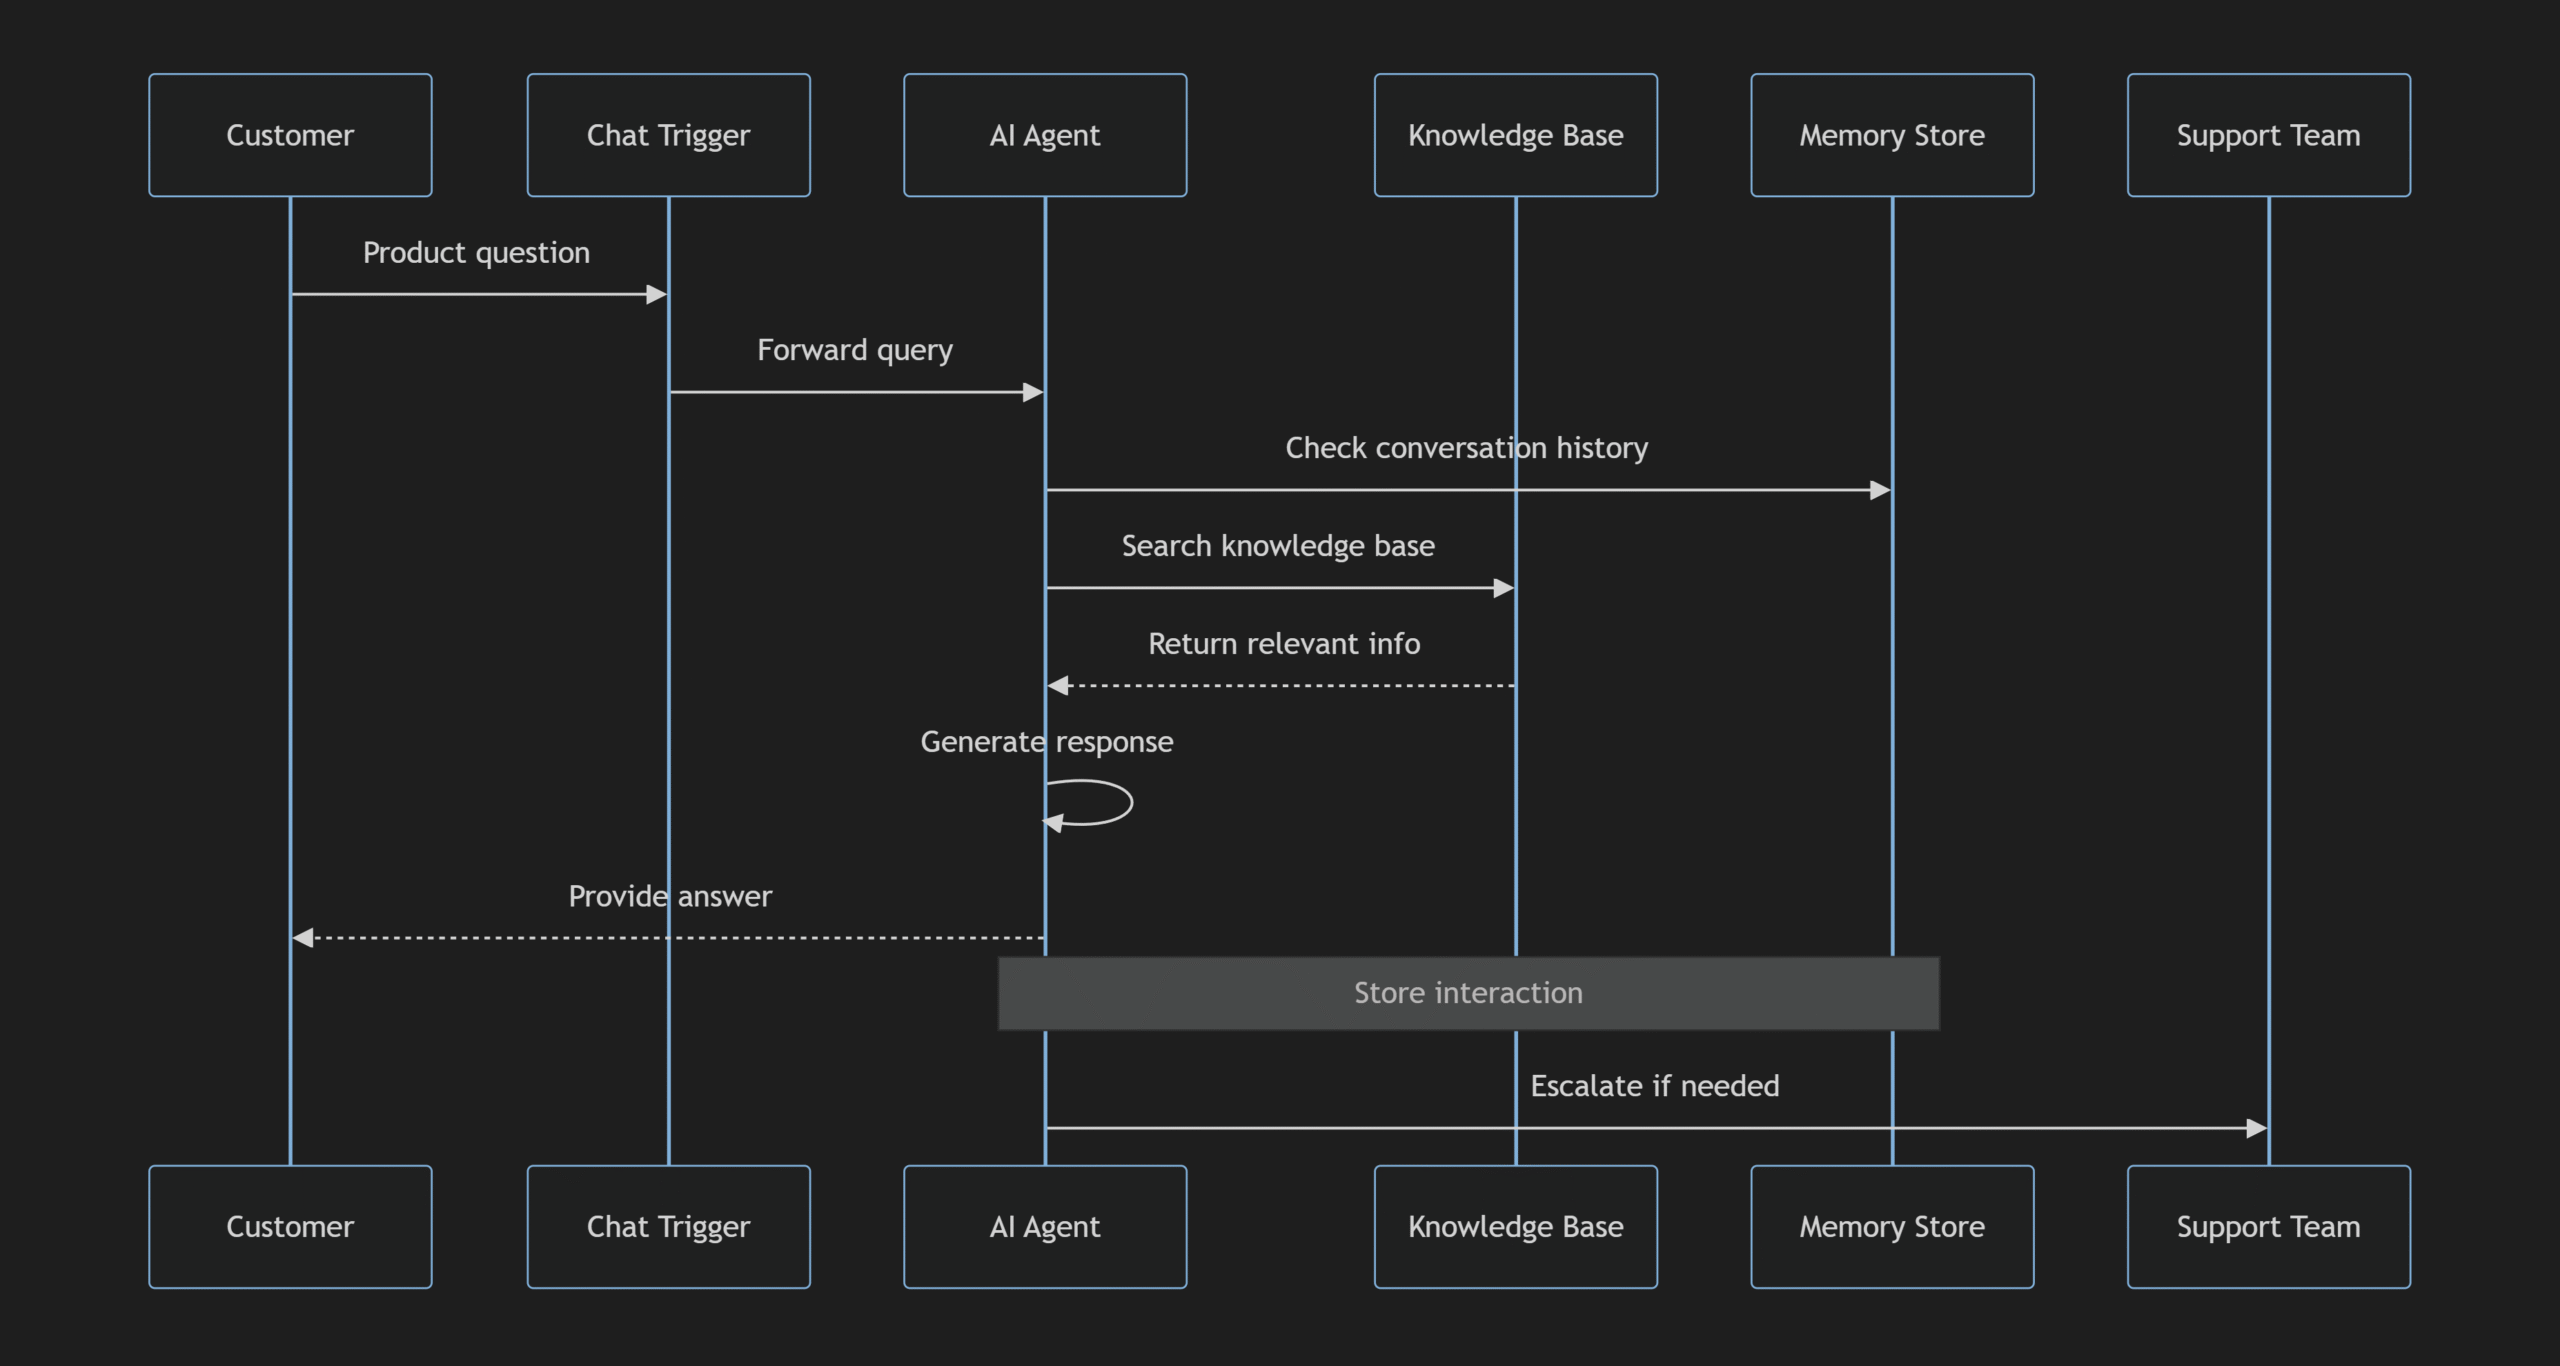
Let’s create a comprehensive customer service agent that:
sequenceDiagram
    participant C as Customer
    participant T as Chat Trigger
    participant A as AI Agent
    participant K as Knowledge Base
    participant M as Memory Store
    participant S as Support Team

    C->>T: Product question
    T->>A: Forward query
    A->>M: Check conversation history
    A->>K: Search knowledge base
    K-->>A: Return relevant info
    A->>A: Generate response
    A-->>C: Provide answer
    Note over A,M: Store interaction
    A->>S: Escalate if needed
The above is using Mermaid text to sequenceDiagram to demonstrate full process. Here is the image version for your download and saved:

| Challenge | Solution |
|---|---|
| AI Hallucinations | Add fact-checking nodes and verification steps |
| Context Limitations | Implement summarization for long conversations |
| API Rate Limits | Add rate limiting and queueing mechanisms |
| Cost Management | Cache responses and monitor usage metrics |
| Response Consistency | Use strict output schemas and validation |
n8n is not just a tool; it embodies an automation mindset. It liberates us from tedious operations, allowing focus on higher-value creative work.
Remember: In the future, those who cannot design AI workflows might be replaced by those who can.
Just as Excel transformed financial work, n8n is reshaping how development, operations, product, marketing, and various other roles work. Every workflow is an AI agent—it can understand instructions, acquire information, make judgments, and execute actions.
Now, open http://localhost:5678 and create your first automated workflow! Let AI become your most capable digital employee.